Part I — Capsule Thinking for Lips (and why it saves time & money)
Open your drawer. If you’re like most people, it’s a museum of almosts: three nudes that were “fine at the counter,” two reds you respect but rarely wear, a berry that felt brave, a gloss that misbehaves, and a handful of bullets that would be perfect if the light, the outfit, and the room all cooperated. Capsule thinking rewrites that chaos. Instead of chasing shades, you assign roles. Instead of guessing by tube color, you decide by room, light, and mood. And instead of buying again and again, you learn the three variables that determine whether any lipstick looks inevitable on your face: depth (light–medium–deep), undertone (warm–cool–neutral), and finish (matte–satin–cream–gloss–stain). Master those, and eight pieces will carry you from Monday LEDs to Saturday candlelight—calmly, creatively, and without drawer guilt.
This first part builds the mental model. You’ll audit what you own, discover your true MLBB (my-lips-but-better) and “power family” (the statement zone you can always trust), and learn fast tests that predict how a shade behaves in real rooms—not just in bathroom lighting. The goal isn’t minimalism for its own sake. It’s fluency: the ability to make your existing colors say more with less effort.
1) Rethink lipstick through wardrobe logic
Wardrobes work when items have roles: a blazer that earns its keep at meetings and flights; denim that handles brunch and school runs. Lipstick is the same. The capsule lens breaks down like this:
Spine pieces (everyday translators): an MLBB in satin (believable in any light) and the same lip-depth family in cloud-matte (structure for LEDs and cameras).
Workday anchors: a mid-rose or brown-rose that looks intentional under cool lighting and pairs with tailoring.
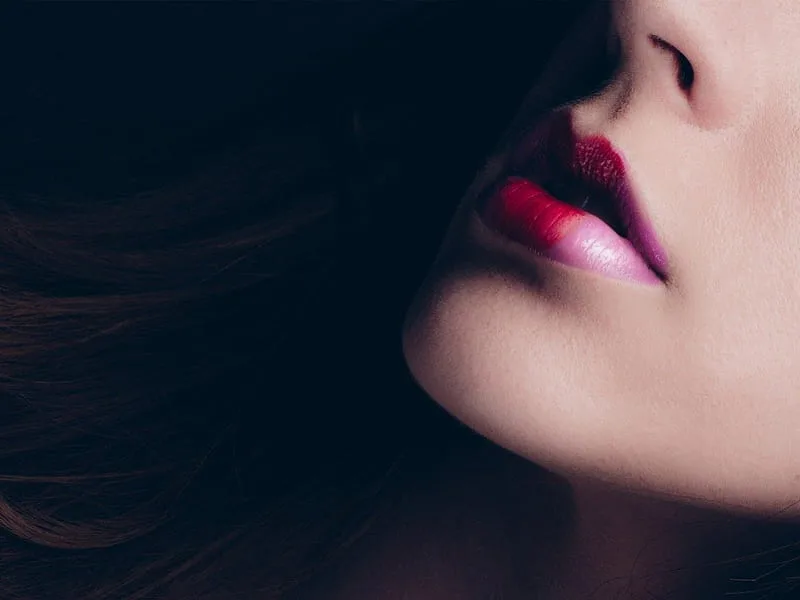
Statement family: the one bold zone that never feels like a costume on you—blue-red, brick/terracotta, or berry/plum.
Evening amplifier: a thin lacquer-stain or a glass-satin that turns any daytime lip into candlelight drama without remaking your face.
Comfort tool: a serum-balm or cream that makes dry days look polished, not apologetic.
Control tools: a neutral liner (one tone deeper than your lip), a temperature editor (mauve to cool, peach/caramel to warm), and a clear barrier pencil for feathering days.
You’ll recognize something: many “new shades” are actually the same role in slightly different undertones. Capsule thinking prevents you from buying the same job twice.
2) The three variables that actually decide everything
Depth.
If a nude looks chalky or a red looks severe, depth is usually the culprit. Match lip depth, not skin depth. Your perfect nude is generally one step deeper than your bare lips; your most wearable statement sits one step deeper than you think when you’re standing under store lights. For photos, mid-depth shades translate best; ultra-pales and ultra-deeps can vanish or block up.
Undertone.
Undertone is the temperature of the color relative to you. Lips can be warmer or cooler than surrounding skin.
Warm lips (peachy, brick-rose) tilt bullets warmer; cool lips (mauve-rose) cool everything down.
To keep a coral civilized, veil with mauve liner first. To keep a berry from going fuchsia, veil with peach/caramel.
If a red flips between rooms, undertone—not formula—is to blame. Solve with a two-liner test (more on this below).
Finish.
Finish is mood and engineering combined.
Cloud-matte (matte that bends) gives structure for LEDs and cameras.
Satin looks like healthy skin moisture—credible anywhere.
Cream reads plush and forgiving on dry days but transfers more.
Gloss is volume and light; keep it center-only for control.
Stain is the no-babysitting backbone for long days and heat.
Often you don’t need a new color—just a finish swap: blot cream to stain for daytime, add micro-sheen for evening, cloud a matte edge to soften the message.
3) Quick audit: keepers, shifters, dupes
Pull every tube. Under a window (indirect daylight), draw three columns on a sheet of paper: Keepers, Shifters, Dupes.
Keepers are shades that always feel right in at least two different rooms (daylight + LEDs, or LEDs + evening). Swatch on lips, step to a mirror in daylight, then under a cool overhead light. If your eyes look clearer and skin looks calmer, it’s a keeper.
Shifters are almost-rights that misbehave due to undertone or finish. Put these in the “edit by liner/finish” pile: many can be rescued.
Dupes are multiples doing the same job. Decide which formula feels and performs best and retire the rest to a “studio” box for experiments (mixing, photos)—or give them away.
You’re not throwing things out yet. You’re sorting by function, the way you would decide between two similar coats by which one actually survives your commute.

4) The 10-minute MLBB discovery lab
Your MLBB is not beige by default; it’s your own lip color, clarified. To find it:
Erase the red ring. Tap a breath of skin-tone concealer around the mouth and pat to invisible. This neutralizes halo redness that lies about color.
Swatch families, not tubes. Try tea-rose, brown-rose, spiced caramel, mauve-rose—one finger dab each—across your bottom lip.
Blur and compare. Press each sample with a fingertip to blend toward the top lip. Smile gently; see which zone makes your teeth and eyes look quietly brighter.
Lighting check. Walk to a window, then stand under a cool light. If one candidate survives both, that’s your MLBB family.
Finish truth. Apply it in satin on one half, blot to stain on the other. Which half suits your life? That’s the finish for your MLBB spine.
The right MLBB should look composed on bare skin and seamless under a full face. If you can’t tell where your mouth ends and the lipstick begins—but your features look more organized—you’ve found it.
5) Find your “power family”: red, brick, or berry?
Everyone has a statement zone that never feels like dress-up. Use the Five-Room Test:
Daylight mirror: which family—blue-red, brick/terracotta, cocoa-berry/garnet—makes your face look awake without other makeup?
LED lighting: which one keeps its dignity (edges legible, color not shrill)?
Warm lamp/candlelight: which one turns luxe without looking sticky or loud?
Phone selfie (front camera): which one stays legible without over-brightening?
Arm’s-length stranger test: step back. Which one feels like your voice amplified, not a costume?
If two tie, consider wardrobe reality: camel coats, oat knits, denim, navy, and olive love brick/terracotta; crisp black, white, charcoal love blue-red; creative textures and jewel tones love cocoa-berry. That’s not a rule—it’s a shortcut.
6) Decide by room, light, and mood (the capsule translator)
Before you open a tube, answer four questions:
Where am I going? LED office, daylight errands, warm restaurant, or camera-heavy event?
What do I want to signal? Clarity (lead), warmth (connect), celebration (play), or care (recover)?
How much upkeep can I tolerate? None, light, or fine?
What’s the fabric story? Matte (wool, tweed, suiting) vs. slick (silk, satin, sequins).
Translate:
LED + clarity + low upkeep + matte tailoring → cloud-matte MLBB or blue-red soft-matte with crisp edges.
Daylight + connect + light upkeep + denim → satin MLBB or tea-rose stain with blurred edge.
Warm restaurant + play + light upkeep + silk → stain under satin, micro-gloss on the bow.
Camera-heavy + clarity + low upkeep + black/white → mid-value soft-matte (red or rose) and defined Cupid’s bow.
Soon this becomes automatic: the room chooses the finish, your mood chooses the family.
7) Techniques that multiply every shade you already own
Stain under anything.
Build longevity and calm chroma by laying a liner veil or thin pass of your bullet, blotting firmly, pressing pigment in with fingertip, then applying your finish. When sheen fades, color remains. This turns wild brights into day-friendly statements and makes nudes survive coffee.
Cloud the edge.
If a shade feels stern, use a clean fingertip to blur the perimeter by a millimeter. Your lip reads friendlier, the color reads more modern, and the look breathes on camera.
Center-only sheen.
Place gloss or balm only on the Cupid’s bow and center. You’ll get volume without wander; under warm light, the lip looks fresh, not sticky.
Temperature edit with liner.
Two pencils—mauve and peach/caramel—let you steer almost anything. Mauve tames oranges and corals under LEDs; peach warms berries that go fuchsia; both clarify reds across rooms so you stop chasing “the perfect red.”
Corner triangles.
Fill a tiny triangular spot at each corner with neutral liner before anything else. Your midday face will thank you: edges stay upright, and color quit hollowing out on calls.
8) The one-ply tissue rule (why thin beats thick)
Most modern lipsticks are engineered to self-level at thin film weights. A single blot between two light coats builds a stronger lattice than one heavy pass. Two seconds, hours returned. If you need more presence, add edge definition, not bulk; bulk cracks, definition reads intentional.
9) Micro-habits that keep the capsule honest
Hydrate early, blot before color. Moisture belongs in the lip, not on it, at application time.
Halo the border. A tiny ring of skin-tone concealer neutralizes the red halo that makes edges messy and nudes chalky.
Plan for the inner rim. Apply short of the wet line by 1–2 mm; capillary action will carry color; you won’t get the donut fade.
Use SPF around the mouth. Border hyperpigmentation is often sunlight and heat. A stick-format SPF used like a pencil is the least annoying fix.
Reset smart. At 3 p.m., blot, reinforce corners with liner, micro-coat only where missing, add a pin-prick of sheen. Ninety seconds, not a restart.
10) The capsule audit, step by step
Spread your tubes on white paper near a window. Take a quick photo; thumbnails reveal redundancy.
Swatch by family on your lips, not hands: MLBBs, reds, bricks/terracottas, berries, corals, plums, nudes.
Choose within families using the two-light test (daylight + LED). Promote anything that survives both with minimal effort.
Demote near-duplicates. Keep the best-feeling, best-wearing formula; put twins in a “studio” box (for mixing, travel risk, or gifts).
Rescue shifters using the temperature editor trick. If a coral calms over mauve and behaves in LEDs, it graduates.
Fill gaps by role, not shade: if you lack a workday rose that behaves under LEDs, that’s the only buy you consider. If you lack an evening amplifier (lacquer-stain or glass-satin), that’s the buy.
Name your roles out loud (yes, really): “Everyday satin,” “Soft-matte spine,” “Work rose,” “Power red,” “Brick anchor,” “Evening lacquer,” “Comfort cream,” “Clear topper.” Naming kills impulse duplication.
11) MLBB vs. nude: stop confusing them
A nude is a color that approximates your skin or aesthetic palette; it can be pale and chic—or chalky and cruel. MLBB matches your lip’s natural depth and tint, then refines it. If a “nude” fails, try treating it like a topper over your MLBB: a light tap at the center to create dimension. Or, use Depth Anchor liner on the outer thirds, keep the nude to the center, and you’ve made a sophisticated ombré that reads plush, not erased.
12) Pair lips with outfits like a stylist, not a rulebook
Black/white/charcoal tailoring loves blue-red (crisp) and brown-rose (credible).
Camel, oat, tweed, olive adore brick/terracotta (warmth with intellect).
Denim, white tee, leather jacket sing with tea-rose MLBB by day, vinyl cherry at night.
Silk, sequins, satin benefit from matte or soft-matte lips that ground the shine; add a pin-prick of gloss center-only for balance.
Minimal makeup days look current with blurred stain or glass-satin MLBB; edges can be clouded without reading messy.
Instead of memorizing combinations, ask: What’s the loudest surface on me? Let lips either echo it (matte with matte) or balance it (satin against slick).
13) Camera literacy: make your capsule screen-proof
Phones compress detail and exaggerate glare.
Prefer mid-depth shades; keep gloss center-only.
Define Cupid’s bow even for casual looks; cameras erase soft edges first.
If a shade looks dull on webcam, increase chroma one notch or cool the base with a mauve veil.
Avoid ultra-deep near-black for important calls; they can “black out.” Instead, use cocoa-berry or garnet soft-matte for depth that cameras can read.
A camera-safe capsule means fewer emergency mirror checks and more professional poise.
14) The psychology dividend of a capsule
When your bag contains roles instead of randoms, you decide faster and check the mirror less. That attention flows to the meeting, the dinner, the stranger you’re greeting. Confidence isn’t the color; it’s the reduction in friction. A capsule doesn’t make you predictable—it makes you consistent on your terms. You still have play (a vinyl cherry, an ultraviolet plum), but play becomes a choice, not a gamble.
15) Build the shopping list last (and keep it small)
After the audit, you should need at most one or two items to complete the eight-piece plan. Typical gaps:
A true MLBB in satin because you’ve been living in nudes.
A cloud-matte in the same family for LEDs and cameras.
A disciplined work rose if everything you own is either too beige or too bright.
Your power family in the right finish (soft-matte blue-red, terracotta satin, cocoa-berry satin).
An evening amplifier (lacquer-stain or glass-satin) to lift day looks.
A neutral liner and one temperature editor if your shades keep shifting on you.
Buy the role, try it in two lights, and make sure it plays with what you wear most. If it doesn’t do at least two rooms (daylight + LED or LED + evening), it’s not a capsule piece—it’s a curiosity. Curiosities are fine, but they live outside the eight.

16) Your capsule checkpoint ritual (monthly, five minutes)
Line the eight on white paper; take a quick photo. Does the palette look coherent or redundant?
Check the roles: has any life change (hair color, job, season) shifted your needs?
Retire the laggard that you’ve avoided three times in a row; replace only if the role is truly missing.
Clean your tools: sharpen liners, wipe bullet tips, wash the mini brush if you use one. Performance is partly hygiene.
This little ritual keeps your kit honest and surprisingly inspiring.
17) Bring it together
Capsule thinking doesn’t reduce your options; it multiplies them by making each choice clearer. The same MLBB can be satin for brunch, blotted to stain for errands, cloud-matte for panels, or glass-satin for dinner. The same brick can be day-stain, office satin, or evening velvet with a center glaze. With eight pieces tuned by depth, undertone, and finish—and a few minutes of lighting literacy—you stop hunting for the perfect tube and start making the tubes you own perform. That’s the magic: not fewer lips, but smarter lips, aligned with your rooms, your clothes, your calendar, and your voice.
In Part II, we’ll specify the eight roles, offer swappable undertones for each, and show exact techniques to convert one bullet into three looks. For now, do the audit, find your MLBB and power family, and name the rooms you live in most. You’ll feel the shift the next morning when you choose in ten seconds, apply in ninety, and leave the mirror already sure of yourself.